Thursday, September 29, 2011
Friday, September 9, 2011
Thursday Review Club
Our Thursday Review Club started a new year this past September!
Jotana and I hosted at the united Methodist church and I have to say that it turned out beautifully!
Jotana and her husband made a wonderful meal of chicken parmesan and all of the goodies that go along with an Italian meal!
Like yummy olive oil for dipping!
I went with a white vintage garden for my decorating inspiration as our club theme this year is gardening for the soul.
I added in a bit of birthday bash to add a hint of color and to try to change it up a touch from last year. We had cupcakes with the colored candles and dessert plates that matched each persons birth stone. I had cupcake wrappers printed up but they came out to big to fit. O'well right?!
The flower balls hanging on the vintage frame are made out of gift tissue and cupcake wrappers.
I also made a few flower napkin rings from silk flowers and twine.
I also made a few flower napkin rings from silk flowers and twine.
You can click the pictures to follow the links for the tutorials on how to make them. The rest of the napkin rings were grapevines from save-on-crafts.com. I used burlap as the table runners and added lots of glass jars, vases and anything vintage bird or nest like that I could find. The little glass birds and wine stopper came from pier one.
The chalkboard door hangers were the take home memento for the evening.
I bought the wood from hobby lobby and my husband and I painted them with about two coats of chalkboard paint then added a gold leafing to the edges. I added a velvet ribbon and gem stone to bring in the birth stone color again, or at least as close as I could find! The Wheeler Thursday Review Club sign is made in the same manner and just added acrylic rhinestones to the edges for an extra shine.
Such a lovely evening and I cant wait for our next meeting! Great friends and food!
Thursday, September 8, 2011
we are off to school!
Alex has started pre-k!
He is in Mrs. Galmor's class and he loves it! There are just five boys and so far they all seem to get along great!
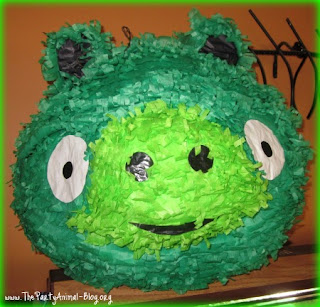
We have already noticed a couple of changes in Alex's speech (such as more "May I" less "Can I") and a few mannerisms. When Luke and I go to pick him up from school, Alex doesn't like for Luke to play with his new friends. They are his, not Luke's according to him. And if he wasn't precise about what he wanted before, he sure is now! He has become even more independent than ever and loves it when he gets to bring library books home. He has only had one "home work" assignment that was tracing his name (which he did so well on!) They also decorated cupcakes for another students birthday and Alex hasn't given up on the fact that everyday is now his birthday no matter how many times we tell him its not until December! So I've started planning his birthday party and its looking to be a "high flying adventure"! I've been working on an Angry Birds theme and have found so many cute ideas! Like this pinata
Its hard to believe that our little baby is turning five. Time is flying so quickly but we are having a blast along the way. Hope you have a wonderful weekend.
With Love,
An angry bird landed on a door knob. Then flew off the handle.
Wednesday, September 7, 2011
Little pretties
Trc was quickly approaching and I was hosting! I had a vintage garden theme in mind and went searching for ideas that would fit. I came across these lovely soft fluffy tissue flower balls.
 |
| http://www.save-on-crafts.com/flowerballs11.html Usually used in weddings, showers and birthday parties, I decided to take on the project for the club meeting! Our theme for the year is "Gardening for the Soul" and I thought they couldn't be more perfect. Here's how I went about making them! Instead of just according folding the tissue (I failed twice on as they rip very easily like that) I cut the tissue into squares and used sewing pins to attach each one to a Styrofoam ball. Yes it did take a bit of time to fill in but they each turned out so pretty! |
What you need:
 |
| Scissors, Styrofoam ball, Tissue paper, Pins (I used around 100 per ball), Lace or string to hang |
 |
| Place Pin in center |
 |
| Pinch one side together |
then the other
 |
| Then the other |
 |
| Twist gently around pin. ( You will get the hang of this part quickly) |
 |
| Insert into ball (with hot glue to hold in place if you want to keep it for longer than one night) |
 |
| Work your way around filling in one side and then the other. |
Subscribe to:
Comments (Atom)


